Testing
The suspension and chassis were tested through a vertical drop test, front impact test, and a leveling test. These tests ensure the car does not fail when competing in the ASME competition. As well as provide an evaluation of the suspension system. The weight of the chassis plate, suspension arms, and car will be measured to verify they meet requirements. The tests also verify if all connecting pins and screws are the correct material and thickness.
Drop Test
The drop test was designed to simulate the RC Car going off a jump. It was a requirement that the car would be able to withstand a drop from a height of 1.5 feet. After each trial of the test a visual inspection, functionality test, and minimum height of the chassis plate was recorded. After the test, the change in height of the chassis plate was determined. This was needed to determine the impact force and the percentage of suspension used during the drop test.
Prior to performing the drop test, the yard stick was taped to the wall and checked to make sure it was level for the most accurate results.


The setup of how the drop test was performed. A phone was set up in slow motion video to see the minimum height of the chassis plate. Also, there is a mark on the yard stick that helps align the car up with the correct height for the drop.
The drop test being performed.
Slow motion video of the drop test.
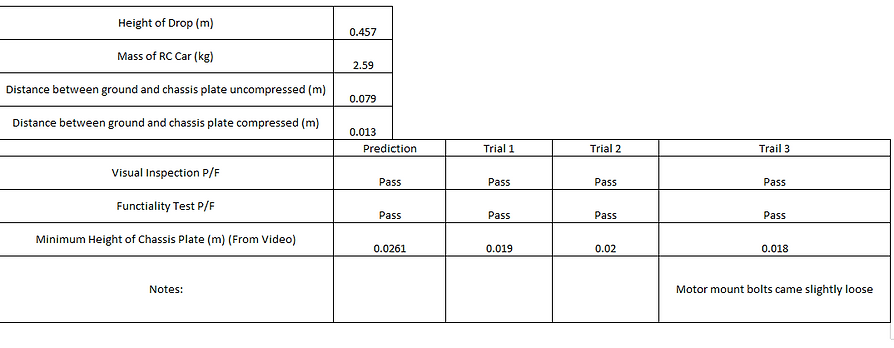
The results from the drop test.
Evaluation of the results from the drop test.
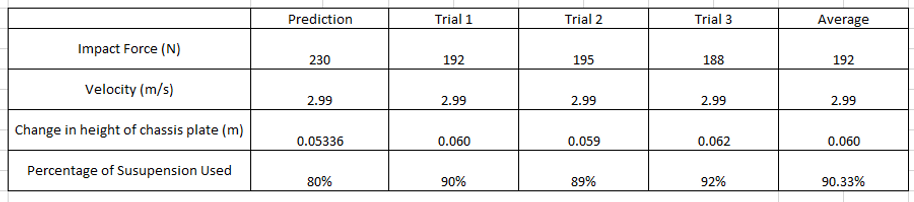
The drop provided valuable data that was used to adjust the suspension. The overall test showed that the RC Car met the requirement of being able to withstand a drop from a height of 1.5 feet. It was desired that the RC Car would only use 80% of its suspension during this drop. From the evaluation of the results, it is seen that on average the RC Car was using 90.33% of the travel. To reduce the amount of suspension being used during the drop, two adjustments can be made. The springs on the shocks could be changed out with springs that have a larger spring constant or the compression dampening can be increased on each shock. Both of these methods increase the stiffness of the RC Car. It was decided that increasing the compression dampening was the best option.
Front Impact Test
An RC Baja Car will come across many obstacles when being driven. Accidents happen when driving over rough terrain. This test simulates an accident happening by running the RC Car into a brick at a speed of 10 mph and obtaining the necessary data to analyze the results. It is required that the car must maintain functionality from the front impact test. The data recorded during the test includes, distance from wall, mass of RC Car, time from start to impact, visual inspection, and a functionality test. This data was evaluated further to find the force, acceleration after impact, time it took the car to stop after impact, and the velocity.
The third trial of the front impact test being performed.
Slow-motion video of the third trial of the front impact test.
Results from the front impact test.

Evaluation of the results from the front impact test.

For simplicity the front impact test was done in the SI unit system. 10 mph is equal to 4.4704 m/s. The difficulty of the test was maintaining the velocity of 10 mph at impact. The test allowed for the impact velocity to be within 1 mph of 10 mph. This converts to being within .44704 m/s of 4.4704 m/s. The RC Car met the requirement of being able to withstand a 10 mph impact into a wall. It passed the functionality test and visual inspection after each trial. As seen from the video, the bumper completely snapped on the 3rd trial. However, this does not affect the overall functionality of the car as the bumpers purpose is to provide safety for the rest of car. Trial 2 was the outlier, having the lowest velocity during impact. The force at impact averaged to being 500 N over the three trials. This is 79 N lower than what was predicted. The reasoning behind this was because a brick was used instead of a wall, as seen in the slow-motion video the brick moved during impact. This causes the time to stop the car to increase, which overall affects the acceleration and force.
Leveling Test
An RC Baja Car will come across many obstacles when being driven. Objects may hit the chassis plate during this process. The leveling test provides a way to test the chassis plate and shocks by placing weight onto the chassis plate in different locations and taking measurements of the height of the chassis plate. The data being recorded during this test include, the height of the chassis plate at the testing location. The evaluation of the data includes, finding the change in height of the chassis plate and amount of suspension used. It is required that the chassis plate can withstand a 120 N force applied directly to the chassis plate.
Weight being applied to the center of the chassis plate for the leveling test. (This is 10 kg an additional 3 kg was added to the top of the weight)

Alternate angle of the 10 kg applied in the middle of the chassis plate.
The data recorded from the leveling test.

Evaluation of the data from the leveling test.

The leveling test showed the requirement was met by having a force of 120 N applied to the chassis plate. The RC Car passed the visual inspection and functionality test after each trial. More suspension was being used in each location than what what was predicted. However, it is not enough to be concerned about because it is unlikely that a force of that much would be applied during regulars use. The actual amount of suspension being used in the middle compared to the front and rear is less. This is because the force is balanced between the front and rear shocks more. 76% of the suspension was used when the force was applied at the front of the chassis plate, 71% when applied at the middle, and 75% when applied at the rear. The biggest thing that was taken away from this test was the camber angle when the shocks were compressed. It was easily noticeable that there was to much camber when the shocks were compressed, this would make the car become unstable if it were to compress like this off a jump. The camber angle was not intended to be an aspect evaluated during this test.